An Ultimate User Interface Testing Guide + UI Testing Checklist and Examples
We prepared for you an ultimate UI testing guide that will help you to elevate your testing experience and eliminate all bugs in your app user interface.

Today we’d like to talk about user interface testing. Standing as a cornerstone in ensuring a seamless user experience, it delves deep into assessing how functional, consistent, and user-friendly an application is from the user’s perspective. Given the direct impact of UI on user satisfaction (as much as 75% of users judge a company’s credibility based on its UI) its testing becomes paramount for businesses nowadays.
That’s why today DogQ presents the ultimate UI testing guide, with our professional insights into how you can effectively eliminate all bugs from your app’s user interface, guaranteeing an unmatched user journey. Are you ready? Here we go!

Short summary
What is UI testing?
- UI testing verifies that the visual elements of a software application work as expected, ensuring users have a smooth, bug-free experience when interacting with the interface.
Types of UI testing:
- Manual Testing: Performed by testers who check UI elements visually and interactively.
- Automated Testing: Uses tools to automatically verify UI functionality and appearance across different scenarios.
Why is UI testing important?
- Ensures consistency, usability, and quality across different devices and browsers.
- Helps catch visual and functional issues early, improving user satisfaction and reducing post-release bugs.
Best practices in UI testing:
- Start with a clear testing plan and prioritize critical paths.
- Combine manual and automated tests for thorough coverage.
- Regularly update tests to reflect UI changes.
Common UI testing tools:
- Selenium, Cypress, and DogQ for automation; each tool offers different features suited to specific needs.
Main takeaway:
- UI testing is crucial for delivering a reliable, user-friendly application. Combining manual insights with automated efficiency provides a balanced approach to maintaining high-quality UI.
What Is UI Testing?
Let’s start with the definition of UI testing: user interface type of testing aimed to evaluate the visual elements of an app to ensure they function as intended.
This process entails interacting with various app components, like buttons, menus, and forms, to ascertain their responsiveness and accuracy. Essentially, UI testing stands as the guardian ensuring that every interaction point of your application aligns seamlessly with user expectations.
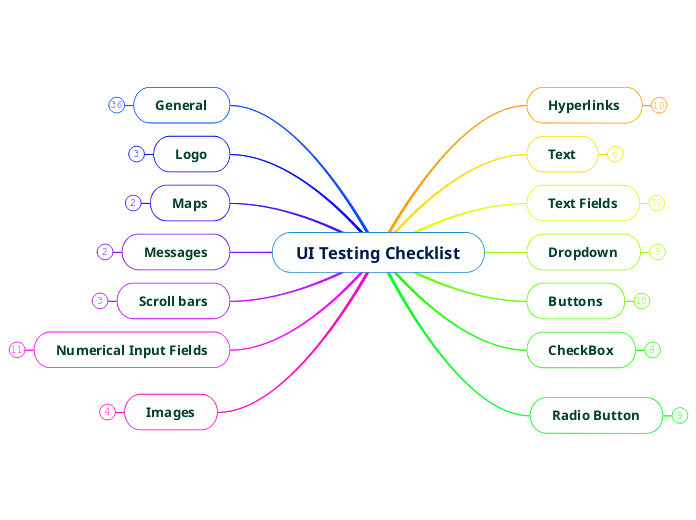
➡️ UI Testing Checklist
UI testing is more intricate than just ensuring that everything visually aligns. It involves delving deep into different UI elements to guarantee their functionality, consistency, and responsiveness. A comprehensive user interface testing checklist is crucial to ensure that the end-users receive a seamless experience across various platforms and resolutions.
Here’s an extended UI testing checklist to guide your testing process:
1. Text Verification
- Legibility: ensure all text is clear and readable. Does it have appropriate contrast against the background?
- Positioning: confirm that no text is obscured or overlapped by another UI element.
- Consistency: ensure uniformity in font styles, sizes, and colors across similar textual elements.
2. Forms, Fields, and Pickers Verification
- Visibility: check that all text fields are noticeable and that users can effortlessly enter and submit information.
- Functionality: confirm that dropdowns, date pickers, and other selectors are fully functional.
- Validation: ensure that fields with specific requirements, like date formats in date pickers, are validated correctly.
- Error Messages: verify the display of clear and instructive error messages for incorrect or missing inputs.
3. Navigation and Sorting Verification
- Navigability: whether it’s a website menu, a multi-step form, or a sortable table, ensure users can smoothly navigate through all options.
- Dropdown functionality: Confirm that all dropdowns manifest as intended and each option can be selected.
- Effects: ensure that selections or clicks on navigation elements yield the expected results or lead to the correct pages.
4. Buttons and Links Verification
- Visibility: all buttons and links should be easily distinguishable.
- Uniformity: ensure buttons and links have consistent formatting and styling across the application.
- Functionality: confirm that every button and link can be clicked or tapped and redirects to the intended location.
5. Responsiveness Verification
- Adaptability: when the display resolution or window size changes, verify that all UI elements adjust and maintain their functionality.
- Cross-platform performance: ensure that the application provides a consistent experience across various devices and browsers.
6. End-to-End User Journey Verification
It’s essential to not only test individual elements but also validate entire user pathways. For instance, a typical user journey might involve:
- Clicking the “Free Trial Sign Up” button.
- Submitting an email address via a form.
- Logging into the free trial using the provided credentials.
- Successfully accessing the trial features of the product.
By rigorously following this UI testing checklist, testers can ensure a comprehensive review of the user interface. Remember, a seamless UI is a significant step towards delivering an excellent user experience.
What Is the Difference Between UI and GUI Testing?
At first glance, GUI (Graphical User Interface) and UI (User Interface) testing might seem synonymous. However, they diverge in their scopes and areas of emphasis. UI Testing assesses the entirety of an application’s user interface, ensuring all components, graphical or not, work in harmony. For instance, this might involve evaluating non-graphical interface components like the command line reader or other elements that the user might interact with indirectly.
On the other hand, GUI testing specifically zeroes in on the graphical components of an application. For example, GUI testing comprises scrutinizing the color schemes of items, the functionality of visually interactive elements like buttons or drop-down menus, and ensuring images render correctly.

UI Testing Approaches
Manual Testing
Manual testing is the most straightforward and traditional approach to UI testing. It involves human testers going through the application’s user interface as if they were the end-users, attempting to find any inconsistencies, errors, or bugs.
This method requires no scripts or automation tools. Testers rely on their expertise, test cases, and keen observation skills to simulate various user scenarios and identify potential issues. Due to its hands-on nature, it offers direct insight into the user experience.
Record and Playback Testing
Record and Playback testing is a type of automated testing where testers perform specific actions in the application while a tool records these actions. Once the sequence is recorded, testers can then “playback” these sequences to re-run the exact same tests.
This approach eliminates the need for scripting and offers a fast way to retest previously executed test cases, ensuring that new code changes haven’t negatively affected existing functionalities.
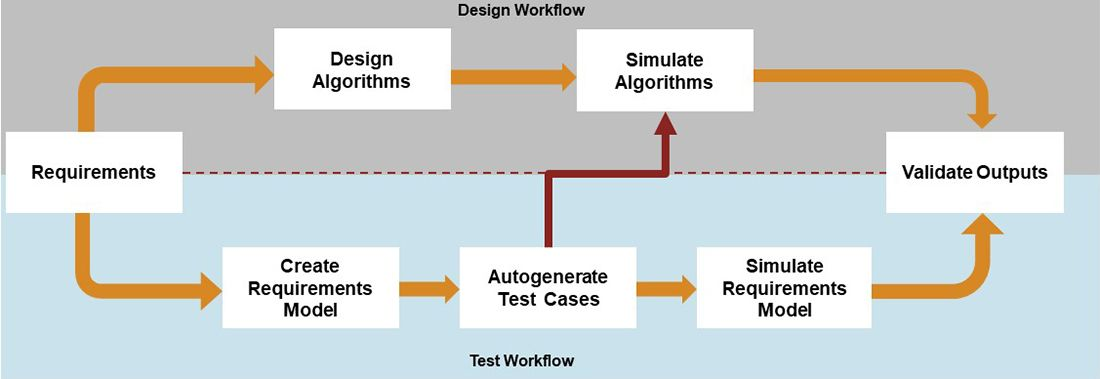
Model-Based Testing
Model-Based Testing (MBT) is an advanced approach that involves the use of a model to represent the system’s behavior. This method offers a structured way of executing tests, ensuring more comprehensive coverage. The steps typically followed in Model-Based Testing are:
- Create a model for the system: Begin by creating a comprehensive representation or “model” that outlines the system’s expected behaviors.
- Determine system inputs: Identify the various inputs that the system will receive, ensuring all possible scenarios are considered.
- Verify the expected output: For each input, predetermine what the system’s output should be.
- Execute tests: Using the model, run the tests on the actual system.
- Check and validate system output vs. the expected output: After tests are executed, compare the results to the predefined expected outputs. Any discrepancies highlight potential bugs or areas of improvement.
Each of these approaches offers unique advantages, and the choice largely depends on the application’s requirements, the available resources, and the specific objectives of the UI testing process.
Automated UI Testing vs. Manual UI Testing
Both automated and manual UI testing approaches are critical in the software development lifecycle, each offering a unique set of advantages. The choice between them depends on the project’s context, goals, and constraints. Here’s a closer look at the advantages of each and the scenarios where they are most suitable.
Advantages of Automated UI testing
- Efficiency and speed: Automated tests can be run rapidly and frequently, allowing for quicker feedback to the development team.
- Reusability: Once scripted, automated tests can be used repeatedly across different versions of the software, ensuring consistency.
- Accuracy: Automated tests eliminate human error, ensuring precise and consistent execution each time.
- Scalability: Automated tests can easily cover a multitude of test scenarios and data combinations in a short time.
- Cost-effective in the long run: Despite an initial investment in setting up, the ability to run automated tests multiple times without additional costs can be cost-effective over the software’s life.
When It’s Better to Use Automated Web UI Testing
- Regression testing: When you need to ensure that new code changes have not affected existing functionalities.
- Load & performance testing: For simulating thousands of users to check system performance.
- Repetitive tasks: For tests that need to be executed frequently and with different data sets.
- Complex calculations: Where there’s a need to validate complex scenarios that are time-consuming and error-prone when done manually.
Advantages of Manual UI Testing
Now let’s see what advantages you can get from using manual testing:
- Human observation: Testers can identify visual and usability issues that automated tests might overlook.
- Flexibility: Testers can quickly modify the test scenario on-the-go based on their observations.
- Cost-effective for a short term: There’s no initial setup cost as in automated testing, making it more feasible for one-time or short-term projects.
- No technical barrier: Unlike automated testing, which may require specialized skills to script tests, manual testing can be done by anyone who understands the application.
- Intuitive feedback: Testers can provide feedback on the “feel” and “usability” of the application, offering insights beyond just functionality.
When It’s Good to Use Manual UI Testing
- Exploratory testing: When testers navigate the application without a set plan, discovering bugs through free exploration.
- Usability testing: For understanding the user-friendliness and overall user experience of the application.
- Short lifecycle projects: For projects that might not justify the time and cost needed for setting up automated tests.
- New or frequently changing UI: When the user interface is still evolving or changes frequently, which might make automation challenging or redundant.
While both testing methods have their merits, the ideal testing strategy often involves a blend of both, leveraging the strengths of each approach to ensure a robust and user-friendly application.
Creating UI Test Scenarios
A test scenario provides a high-level overview of what needs to be tested, offering a clear picture of how the application should behave when used in real-world situations. In essence, a test scenario is a narrative description of an application’s potential use case, including the series of steps a user would follow to achieve a specific goal. By laying out these scenarios, testers can then break them down into individual test cases that scrutinize every potential interaction within that scenario.
Let’s take a more detailed look at what a test scenario is and how it drives the development of individual test cases.
A typical test scenario for an e-commerce application might be: “A user successfully completes an online payment.” Within this scenario, we can identify multiple events and user actions that need to be validated. This can include when a user:
- Selects a product and adds it to the cart;
- Navigates to the cart and reviews the selected items;
- Proceeds to checkout;
- Chooses a preferred method of payment;
- Provides valid payment details;
- Encounters an error during the payment process;
- Receives a confirmation message or email after successful payment;
- Tries to go back and change the payment method after final confirmation.
These high-level interactions from the scenario serve as the foundation upon which detailed test cases are built. For instance, deriving from the above scenario:
Test Case 1: Product Selection and Cart Review
- Validate that the selected product’s details (e.g., size, color, quantity) reflect accurately in the cart;
- Check if the total price updates correctly after adding/removing items;
- Ensure the cart provides an option for users to continue shopping or proceed to checkout.
Test Case 2: Payment Process
- Confirm that users can choose from multiple payment methods (e.g., credit card, PayPal, bank transfer);
- Validate the secure encryption of payment details during the transaction;
- Ensure that mandatory fields (e.g., card number, CVV, expiry date) are indicated and validated upon submission;
- Check the display of a clear error message for failed transactions and guidance for resolution;
- Validate the prompt appearance of a success confirmation upon successful payment, both on-screen and via email.
In conclusion, test scenarios are invaluable in UI testing as they simulate real-world user interactions, ensuring that applications not only function as intended but also offer a seamless and intuitive user experience.
User Interface Testing Example
Now, let’s look at an example of UI testing in real life. Let’s examine this DogQ page: https://dogq.io/users/register/. Here we see the “Create your account now” form and an email field, a password field, and a button called “Create account” (plus a privacy policy notice):
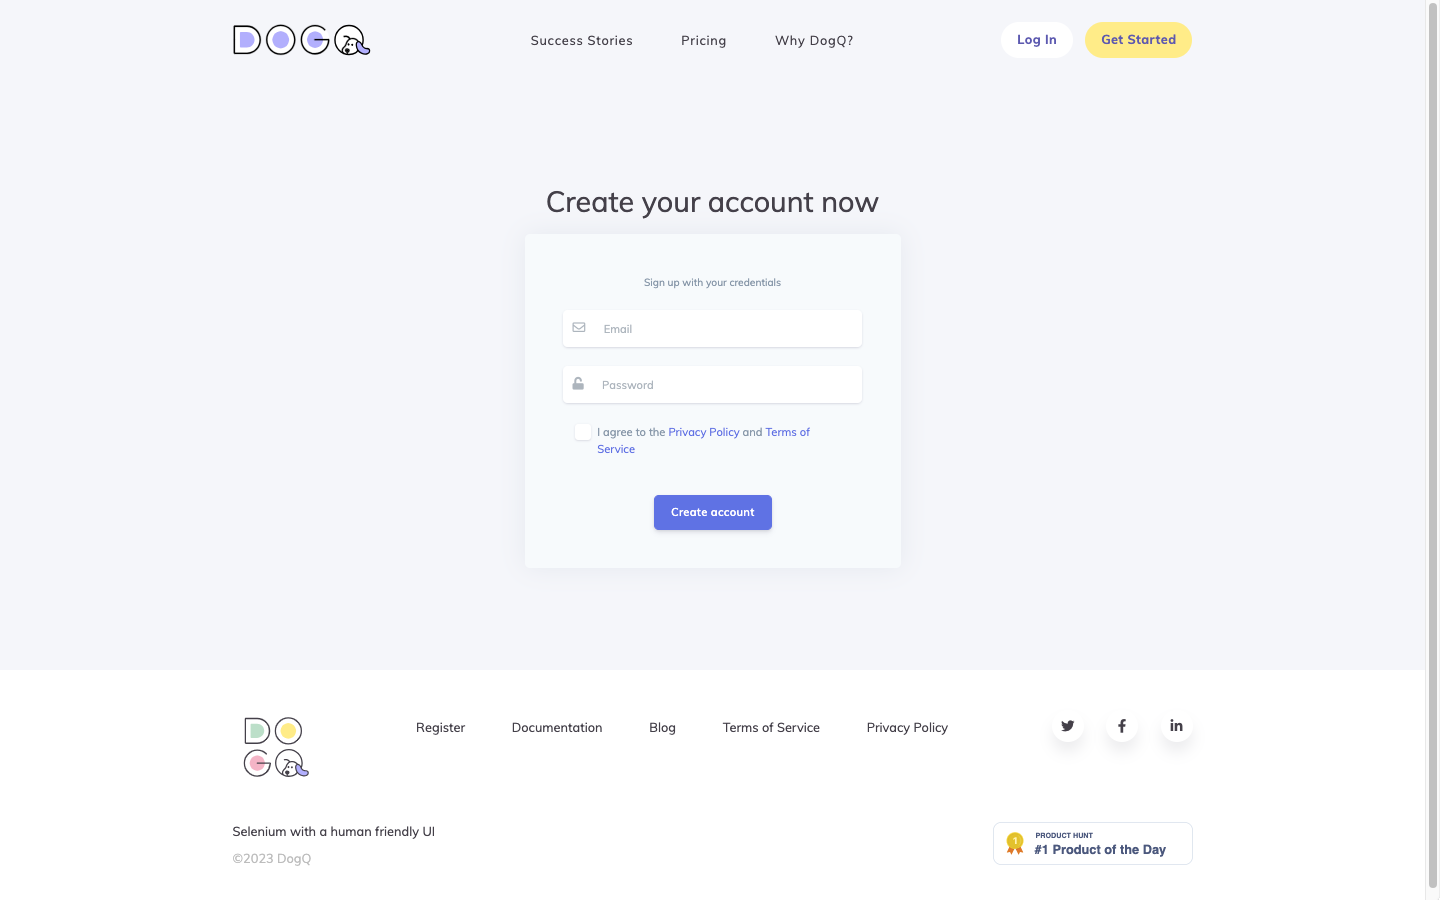
If entering all the fields correctly, a user will get a verification email with the registration confirmation. But how to test whether everything works correctly?
Below, we give various possible test cases examples to test the registration form. Please, pay attention that all the registration forms are different, so they aren’t necessarily 100% applicable to all registration forms (and even our at DogQ). But our goal here is to show you as many test cases examples as possible, so, if you has a different registration form, you can simply pick out the test cases that are suitable, or adapt some of them to met the technical requirements of your system.
Here we go :
1. Required Fields Verification
- Field Validation: confirm that leaving the “email” and “password” fields blank triggers a validation warning.
- Asterisk Indication: ensure that any required fields (like “email” and “password”) are clearly marked with an asterisk or other appropriate indicators to inform the user of their necessity.
2. Data Input Validation
Email Field:
- Verify that only valid email formats are accepted (e.g., [email protected]).
- Confirm that common invalid email formats (e.g., [email protected], etc.) are flagged and not accepted.
Password Field:
- Check that a minimum character requirement is enforced, if applicable.
- Ensure the field prevents entry beyond the maximum allowable characters.
- Confirm that there is an option or guidance for password strength (e.g., including numbers, symbols, upper and lowercase letters).
3. Spelling and Label Verification
- Field Labels: confirm that all field labels, including “email”, “password”, and the “Create account” button, are correctly spelled and appropriately capitalized.
- Placeholder Text: if theres any placeholder text within the fields, ensure it’s free from typographical errors and offers clear guidance on the expected input.
4. Interaction and Functionality
Button Interactivity:
- Ensure the “Create account” button is clickable.
- Confirm that the button is only active or becomes highlighted once the required fields contain valid inputs.
- Verify that upon clicking the button with valid data, the user progresses to the next expected step (email verification).
Field Interactivity:
- Check that users can easily click into, type within, and tab between the “email” and “password” fields.
- If there’s a “show password” toggle or eye icon, ensure its functionality allows users to view their entered password and revert it back to hidden.
5. Error Messages and Feedback
- Invalid Input Feedback: test that the user receives clear feedback for invalid entries, such as an incorrect email format or a password that doesn’t meet strength criteria.
- Successful Registration Feedback: upon successful account creation, ensure that users receive an email confirmation message.
6. Privacy Policy and Terms of Service Agreement Verification
- Checkbox Visibility: confirm that the checkbox for agreeing to the “Privacy Policy and Terms of Service” is clearly visible next to its accompanying statement.
- Active Registration Block: test that when the checkbox is not marked, the “Create account” button remains inactive or displays an error upon clicking, thus preventing registration.
- Error Message for Non-agreement: attempt to register without marking the checkbox. Ensure that a clear and user-friendly error message appears, instructing the user to agree to the terms and conditions before proceeding.
- Clickable Policy Links: check if the “Privacy Policy” and “Terms of Service” in the statement are hyperlinked, and ensure they direct users to the actual pages/documents detailing these agreements.
- Checkbox Interactivity: confirm that users can easily mark and unmark the checkbox, and the interface clearly indicates its selected status.
- Successful Agreement Interaction: after marking the checkbox and providing valid inputs in the email and password fields, verify that the user can successfully register.
By conducting such detailed test cases for their app’s pages, testers can ensure a smooth and intuitive sign-up process for potential users, reducing the chances of user drop-off due to interface issues.
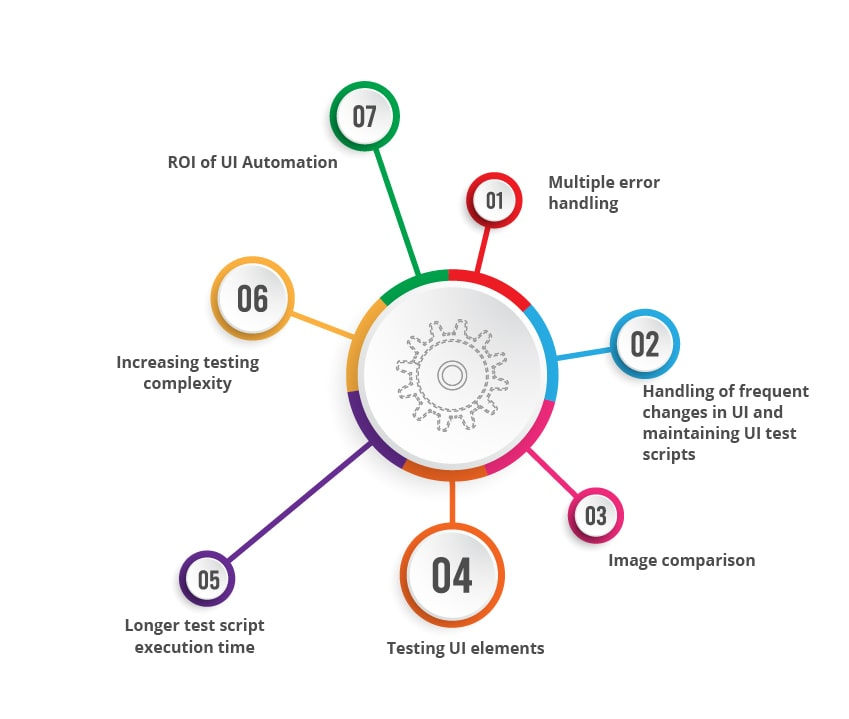
Challenges in UI Testing
Engaging in UI testing often presents software testers with a unique set of obstacles. Delving into some of the prominent challenges they face:
Changing User Interfaces
In today’s dynamic digital landscape, applications are regularly updated to introduce new features or enhance existing ones. This frequent evolution of the UI necessitates constant adaptation in testing approaches, making comprehensive evaluations more demanding.
Complexities in Modern UIs
As applications grow more sophisticated, they integrate a myriad of intricate components such as embedded frames, detailed flowcharts, maps, diagrams, and other specialized web elements. These complexities invariably heighten the intricacy of UI tests.
Time-Intensity of UI Tests
Crafting precise and efficient UI test scripts, coupled with their execution, can be a lengthy process. This is particularly true if testers aren’t equipped with the optimal tools tailored for the task.
Test Script Upkeep
With frequent modifications to the user interface by developers, ensuring that test scripts remain relevant and functional becomes a demanding endeavor.
Addressing Concurrent Errors
When testers are pressed to develop intricate UI test scripts under constrained timeframes, rectifying errors that arise during the testing phase can become an arduous task.
Assessing ROI for Automated UI Testing
As the UI and, correspondingly, the tests undergo changes, the time invested in UI testing amplifies. This escalation often pushes back the delivery timelines. Consequently, determining the actual return on investment (ROI) for persistent UI testing efforts grows more challenging.
By understanding these challenges, teams can devise strategies to mitigate them and streamline their UI testing processes.
Best Practices for UI Testing
To effectively tackle the myriad of challenges in UI testing, consider adopting the following best practices:
Prioritize Optimal UI Testing Tools
The foundation for addressing software testing quandaries lies in equipping yourself with the best-fitting UI testing tools. The market is replete with numerous such tools; however, it’s crucial to select one that aligns harmoniously with your existing workflow. An exemplary UI testing tool not only boasts of record/playback functions but also champions reusability, demands minimal upkeep, and offers robust reporting and defect tracking features.
Embrace Shared Repositories
By utilizing a centralized repository, you can dramatically reduce the time and resources spent on test maintenance. Additionally, by strategically starting with a condensed set of UI test cases and then incrementally broadening the scope, you can heighten the success metrics of your test suite.
Tap Into the World of Codeless Automation
To sidestep the cumbersome task of recurrently updating test codes, it’s worth considering the merits of codeless automation testing tools. Platforms like Perfecto Scriptless, especially for Selenium aficionados, can revolutionize the entire spectrum of test scripting and execution, offering substantial time and cost savings.
Institutionalize Code Review Protocols
The coding ethos of an organization casts a deep influence on its prowess to grapple with testing obstacles during the software development journey. As such, it’s pivotal for firms to invest in enlightening their brigade on superior test automation practices. This not only ensures a standardized yardstick for code assessments and modifications enterprise-wide but also fosters a culture of continuous learning and innovation. Engaging with test automation connoisseurs in rigorous ideation sessions can also amplify the collective expertise.
Armed with these strategies, teams can effectively surmount UI testing challenges, ensuring a smoother and more efficient testing process.
UI Test Automation Tools and Frameworks
Now, let’s look at the top 5 best automated UI testing tools in 2025:
DogQ

DogQ is a modern, no-code testing tool that simplifies the UI testing process by allowing testers to create and run tests without the need for scripting.
- No-Code Approach: enables both technical and non-technical team members to contribute to the testing process.
- Intuitive Interface: streamlines test creation, making the setup process efficient.
- Quick Feedback Loop: provides real-time results, ensuring that any issues are caught and addressed promptly.

Selenium

Selenium is a renowned open-source framework for automating web browsers, providing a single interface for testing across various browser types.
- Cross-Browser Compatibility: allows testing across multiple browsers and platforms.
- Language Flexibility: supports multiple programming languages, including Java, Python, C#, and more.
- Community Support: being open-source, it boasts a robust community that contributes to its growth and troubleshooting.
Cypress

Cypress is a JavaScript-based end-to-end testing framework that provides a comprehensive solution for web UI application testing.
- Real-Time Reloading: automatically reloads tests upon file changes.
- Easy Debugging: provides readable errors and interactive logs.
- Time-Traveling: enables testers to see the state of their application at any point during the test’s execution.
Appium

Appium is an open-source, cross-platform testing tool that allows the automation of native, mobile web, and hybrid applications on iOS and Android platforms.
- Platform Versatility: supports both Android and iOS testing.
- Language Neutrality: allows script creation in multiple programming languages.
- Flexibility: can test all kinds of mobile apps – native, hybrid, or web apps.
Playwright

Playwright, a freshman among UI testing tools, is a Node.js library developed by Microsoft to automate the Chromium, Firefox, and WebKit browsers with a single API.
- Consistency Across Browsers: offers a consistent experience across different browsers.
- Rich Interactions: can handle modern web app features like Single Page Apps.
- Fast Execution: designed for parallel execution, it can run tests quickly.
Puppeteer

Puppeteer is a Node.js library developed by Google that provides a high-level API to control headless Chrome or full Chrome over the DevTools Protocol.
- Headless Testing: enables testing in headless mode, ideal for continuous integration environments.
- Direct Control: offers detailed control over Chrome, allowing granular interactions.
- Rich Functionality: supports screenshot and PDF generation, network interception, and more.
Each of these tools and frameworks has unique features that cater to different testing requirements. When selecting a tool, it’s essential to consider the specific needs of the project and the experience level of the testing team.
DogQ’s team of QA experts is ready to address your inquiries regarding software testing approaches. We are delighted to assist you in selecting the most suitable testing automation solution for your enterprise or software venture, as well as offer any supplementary technical assistance you may require with our no-code testing tool. Do not hesitate to get in touch with us and give our testing platform a go!
FAQ
What is User Interface testing?
UI (User Interface) testing involves the process of ensuring that an application’s graphical interface functions correctly. It ensures that each UI element, such as buttons, text fields, and dropdowns, behaves as expected in response to user interactions.
What is automated UI testing?
Automated UI testing refers to the use of automated tools or scripts to perform UI testing tasks without manual intervention. This enables repetitive and extensive testing scenarios to be conducted more efficiently, ensuring a consistent user experience across different conditions.
Does UI testing require coding?
Not always. Traditional UI testing methodologies often involved scripting and coding, especially for automation. However, with the advent of modern no-code and low-code testing tools, like DogQ, it’s possible to conduct comprehensive UI tests without writing a single line of code.
Latest Posts:
How to Choose the Functional Testing Tool for Your Project. We have the list of automation testing tools for all kinds of projects.
Selenium Automation Testing: Exploring Basics and Getting Started. Explore the fundamentals of Selenium testing.
10+ Best UI Automation Testing Tools. We delve into the depths of UI automation testing, and highlighting some of the best tools available in the market.
Related Posts:
Automated UI Testing Best Practices You Can Adopt Right Away. Reduce the complexity of UI testing, try to use UI testing tools.
Functional vs. Non-Functional Testing: Key Differences and Requirements. What is the difference between functional testing and non-functional testing?
UI, UX and Usability Testing: Everything You Need to Know. The concept of shift-left testing and how it can improve the quality of your product.